Theoretical Background: ROS 2 Development Practice
Module 1 Theory: ROS 2 Practical Getting Started
1.6.1 Setting Up the ROS 2 Environment
Before writing any robotic application, the development environment must be configured. ROS 2 distributions follow a naming convention tied to release year and alphabetical order. The recommended distribution for this course is ROS 2 Humble Hawksbill (LTS, supported through 2027) or ROS 2 Jazzy Jalisco, both targeting Ubuntu 22.04 or 24.04 respectively.
Installation Overview
ROS 2 is installed from pre-built Debian packages on Ubuntu. The installation adds the ROS 2
apt repository, installs the desired configuration (ros-humble-desktop includes
RViz2, Gazebo integration, and demo packages), and makes ROS 2 libraries and executables
available system-wide. The desktop installation provides everything needed for development
including visualization and simulation tools.
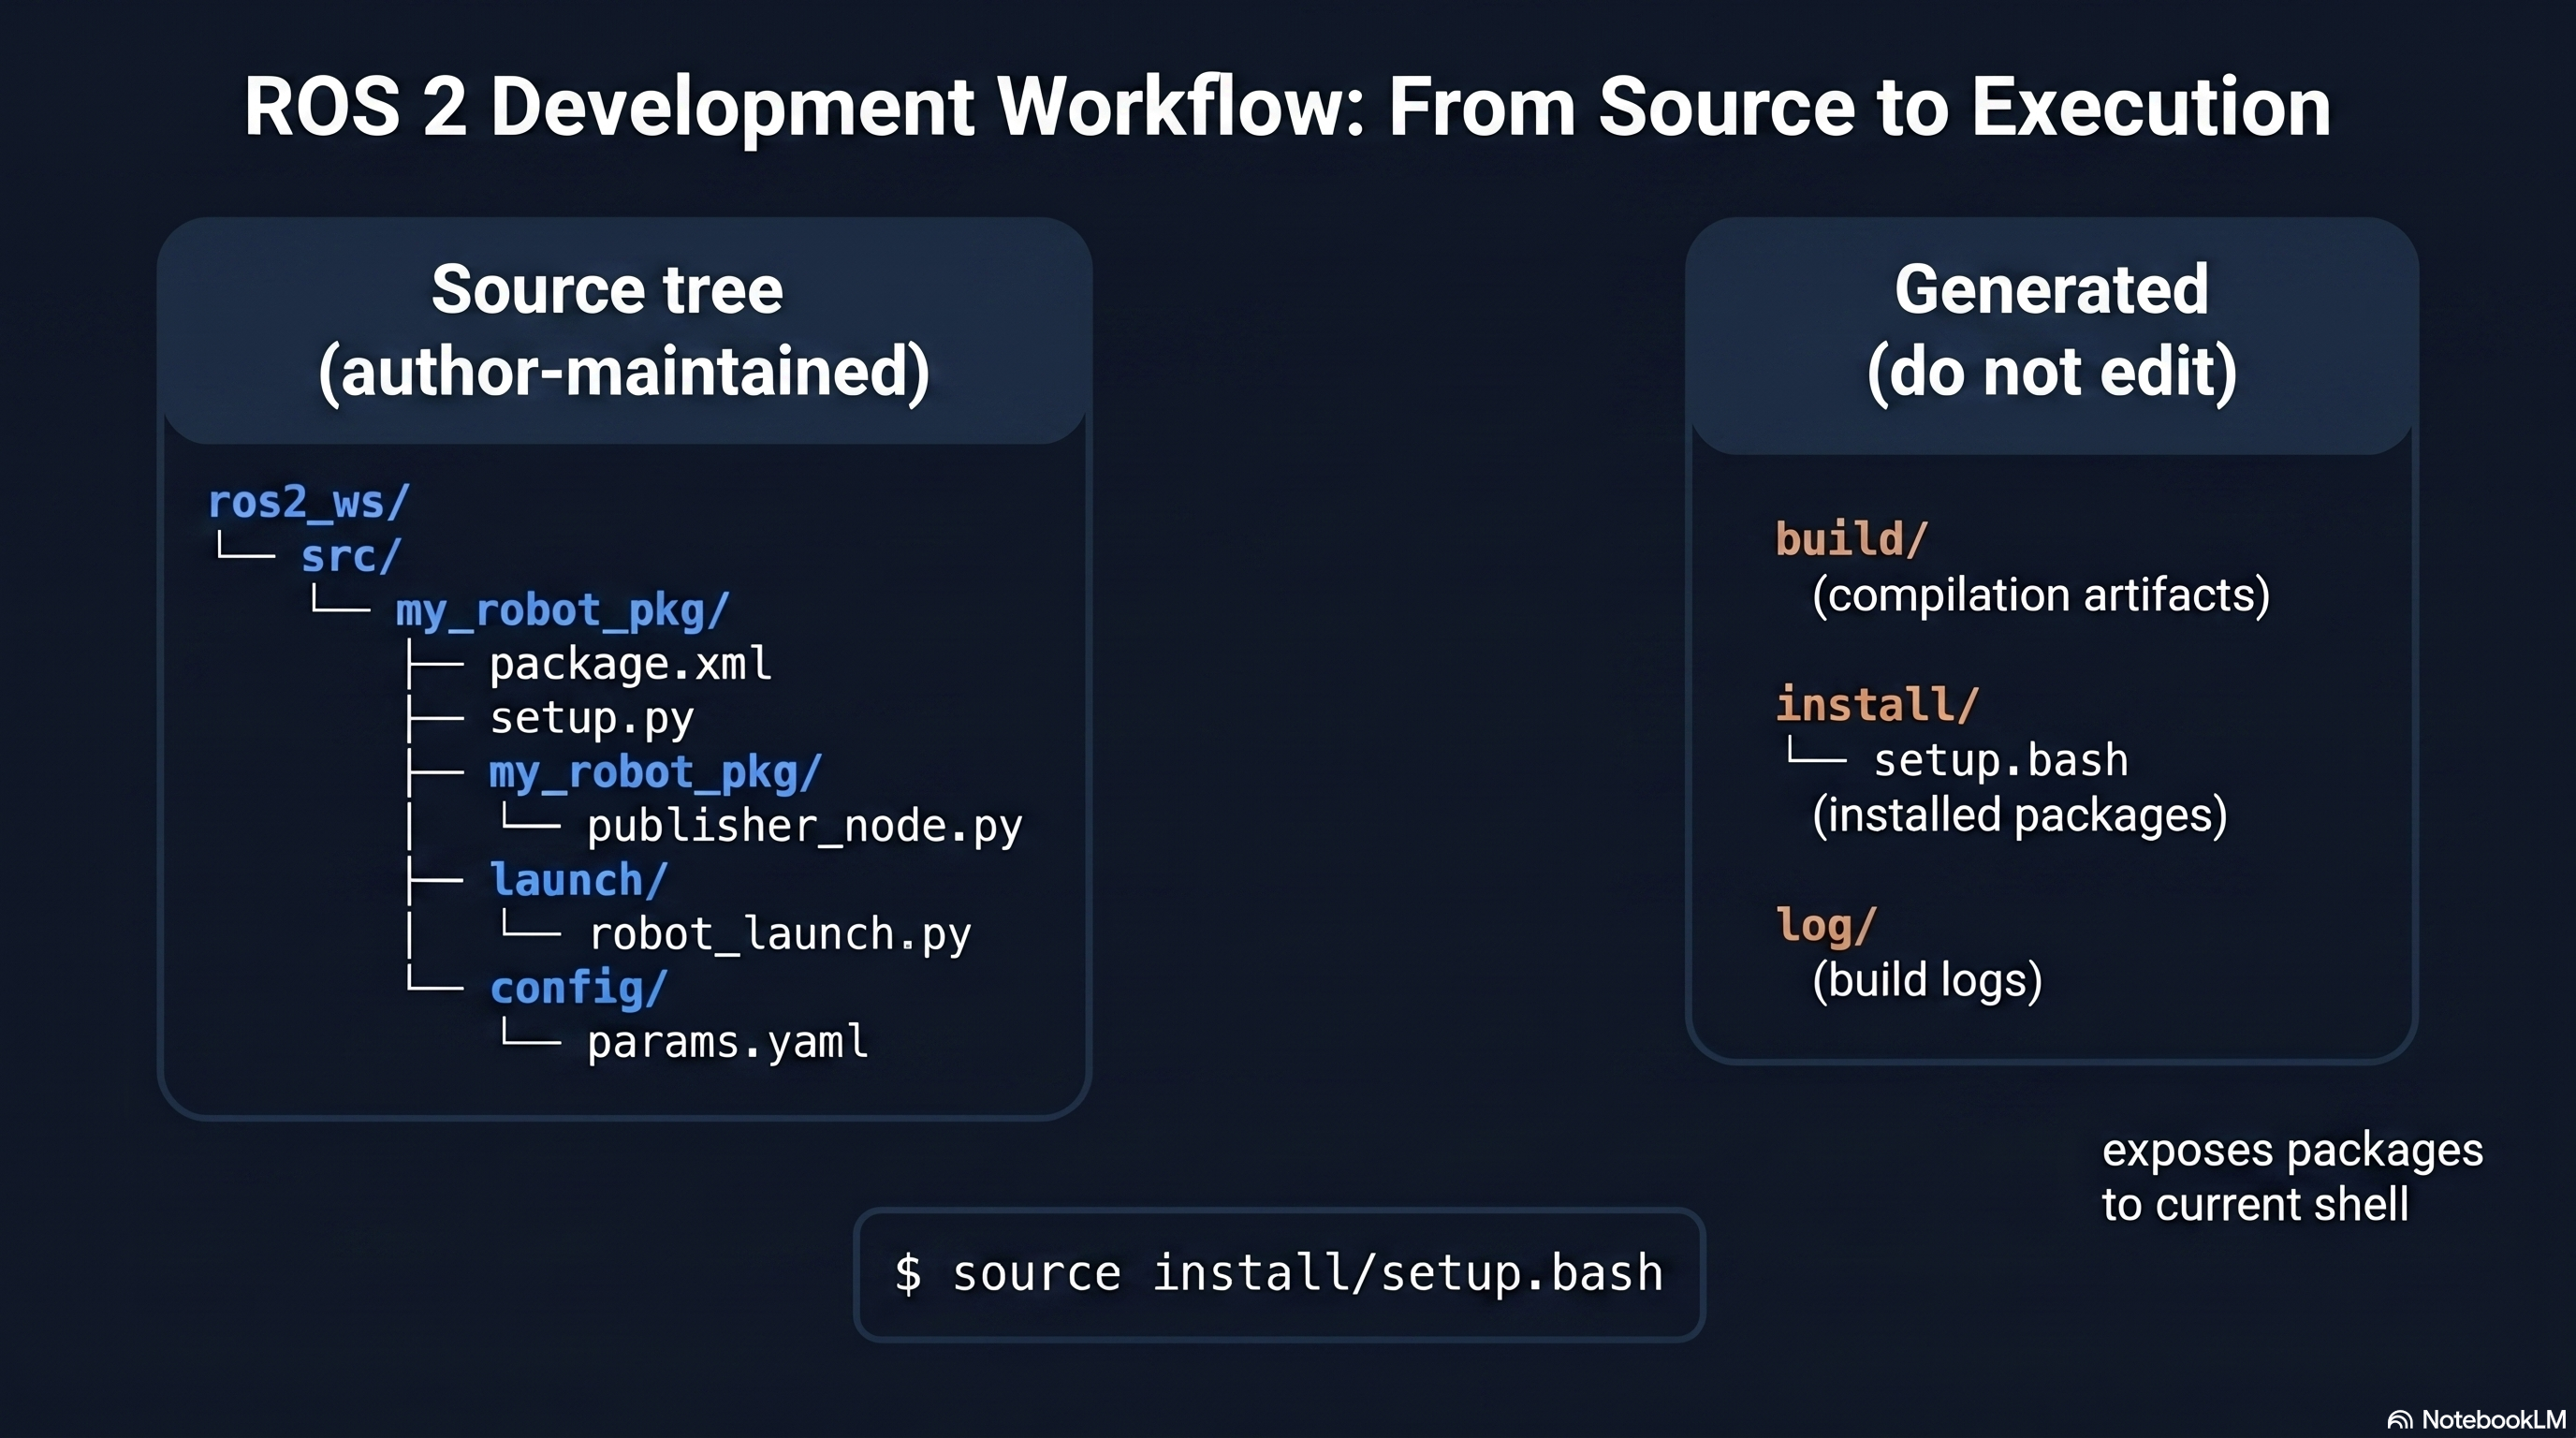
Workspace Creation
A ROS 2 workspace is a directory that contains your custom packages. The convention is to
create a workspace with a src subdirectory where all source packages reside:
# Create a new workspace
        mkdir -p ~/ros2_ws/src
        cd ~/ros2_ws
The workspace is separate from the ROS 2 system installation. Packages in the workspace overlay the system packages, allowing you to develop and test modified versions of any ROS 2 package without affecting the system installation.
Sourcing
ROS 2 uses shell environment variables to locate packages, libraries, and executables. Two sourcing steps are required:
# Source the system ROS 2 installation (add to ~/.bashrc for persistence)
        source /opt/ros/humble/setup.bash
# After building, source the workspace overlay
        source ~/ros2_ws/install/setup.bash
Sourcing the system installation makes all standard ROS 2 packages available. Sourcing the workspace overlay adds your custom packages on top. Forgetting to source is the most common cause of “package not found” errors and is the first thing to check when a node fails to launch.
Environment Verification
After sourcing, verify the environment is correctly configured:
# Check ROS 2 distribution
        echo $ROS_DISTRO

        # Verify ROS 2 commands are available
        ros2 --help

        # List available packages
        ros2 pkg list
1.6.2 Creating Your First Package
A ROS 2 package is the fundamental unit of code organization. Every node, message definition, launch file, and configuration file belongs to a package.
Package Build Types
ROS 2 supports two build types:
- ament_cmake: For C++ packages. Uses
CMakeLists.txtto define build targets, dependencies, and installation rules. Provides maximum performance and is used for computationally intensive nodes (perception, control loops). - ament_python: For Python packages. Uses
setup.pyandsetup.cfgto define entry points and dependencies. Provides rapid development and is used for high-level logic, launch files, and prototyping.
Creating a Python Package
# Navigate to workspace source directory
        cd ~/ros2_ws/src

        # Create a new Python package with dependencies
        ros2 pkg create --build-type ament_python \
        --dependencies rclpy geometry_msgs nav_msgs my_robot_pkg
This command generates the package scaffolding:
# Generated package structure
        my_robot_pkg/
        package.xml              # package metadata: name, version, dependencies
        setup.py                 # Python package configuration
        setup.cfg                # entry point mapping
        resource/
        my_robot_pkg           # ament resource index marker
        my_robot_pkg/
        __init__.py            # Python module initializer
package.xml declares the package name, version, description, maintainer, license, and all build and runtime dependencies. Every ROS 2 message type or library your code uses must be listed here.
setup.py defines the Python package metadata and, critically, the
console_scripts entry points that register your Python scripts as executable ROS 2
nodes:
# Entry point definition in setup.py
        entry_points={
            'console_scripts': [
            'cmd_vel_publisher = my_robot_pkg.cmd_vel_publisher:main',
            'odom_subscriber   = my_robot_pkg.odom_subscriber:main',
            ],
        },
Each entry point maps a command name (used to run the node) to a Python function
(module_name:function_name).
Creating a C++ Package
# Create a C++ package
        ros2 pkg create --build-type ament_cmake \
        --dependencies rclcpp geometry_msgs my_cpp_pkg
The generated CMakeLists.txt file defines how to compile the source files, link
against ROS 2 libraries, and install the resulting executables. The key CMake commands are
find_package (locating dependencies), add_executable (defining build
targets), ament_target_dependencies (linking ROS 2 packages), and install
(placing executables where ROS 2 can find them).
1.6.3 Writing a Publisher Node
The publisher node is the most fundamental ROS 2 program. The following example creates a node that publishes velocity commands to control a differential drive robot.
# cmd_vel_publisher.py -- publishes velocity commands at 10 Hz
        import rclpy
        from rclpy.node import Node
        from geometry_msgs.msg import Twist
        import math

        class CmdVelPublisher(Node):
        def __init__(self):
        super().__init__('cmd_vel_publisher')

        # Declare parameters with default values
        self.declare_parameter('linear_speed', 0.5)
        self.declare_parameter('angular_speed', 0.0)
        self.declare_parameter('publish_rate',  10.0)

        # Create publisher on /cmd_vel topic with queue depth 10
        self.publisher = self.create_publisher(Twist, '/cmd_vel', 10)

        # Create timer for periodic publishing
        rate = self.get_parameter('publish_rate').value
        self.timer = self.create_timer(1.0 / rate, self.timer_callback)

        self.get_logger().info('CmdVel publisher started')

        def timer_callback(self):
        msg = Twist()
        msg.linear.x  = self.get_parameter('linear_speed').value
        msg.angular.z = self.get_parameter('angular_speed').value
        self.publisher.publish(msg)

        def main(args=None):
        rclpy.init(args=args)
        node = CmdVelPublisher()
        try:
        rclpy.spin(node)
        except KeyboardInterrupt:
        pass
        finally:
        node.destroy_node()
        rclpy.shutdown()

        if __name__ == '__main__':
        main()
Code Walkthrough:
- Node initialization: The constructor calls
super().__init__()with the node name, which registers this node with the ROS 2 system under the namecmd_vel_publisher. - Parameter declaration: Parameters are declared with default values. These can be overridden at launch time through launch files, command-line arguments, or YAML configuration files.
- Publisher creation:
create_publisherspecifies the message type (Twist), topic name (/cmd_vel), and queue depth (10). The queue depth determines how many outgoing messages are buffered if subscribers cannot keep up. - Timer creation:
create_timerschedules the callback function at the specified rate. The timer is managed by the executor and fires regardless of whether any subscriber is connected. - Spin loop:
rclpy.spinenters the executor loop, which processes timer callbacks and incoming messages until the node is shut down via Ctrl+C or a programmatic shutdown signal.
1.6.4 Writing a Subscriber Node
The subscriber node receives messages from a topic and processes them. The following example subscribes to odometry data to monitor the robot’s position and orientation.
# odom_subscriber.py -- subscribes to odometry and logs robot pose
        import rclpy
        from rclpy.node import Node
        from nav_msgs.msg import Odometry
        import math

        class OdomSubscriber(Node):
        def __init__(self):
        super().__init__('odom_subscriber')

        # Create subscription to /odom topic
        self.subscription = self.create_subscription(
        Odometry,
        '/odom',
        self.odom_callback,
        10
        )

        self.get_logger().info('Odometry subscriber started')

        def odom_callback(self, msg):
        # Extract position from odometry message
        x = msg.pose.pose.position.x
        y = msg.pose.pose.position.y

        # Extract yaw angle from quaternion
        qz  = msg.pose.pose.orientation.z
        qw  = msg.pose.pose.orientation.w
        yaw = 2.0 * math.atan2(qz, qw)

        # Extract velocities
        linear_vel  = msg.twist.twist.linear.x
        angular_vel = msg.twist.twist.angular.z

        self.get_logger().info(
        f'Pose: ({x:.2f}, {y:.2f}, {math.degrees(yaw):.1f} deg) '
        f'Vel: ({linear_vel:.2f} m/s, {angular_vel:.2f} rad/s)'
        )

        def main(args=None):
        rclpy.init(args=args)
        node = OdomSubscriber()
        try:
        rclpy.spin(node)
        except KeyboardInterrupt:
        pass
        finally:
        node.destroy_node()
        rclpy.shutdown()

        if __name__ == '__main__':
        main()
Code Walkthrough:
- Subscription creation:
create_subscriptionspecifies the message type (Odometry), topic name (/odom), callback function (odom_callback), and queue depth (10). The callback is invoked by the executor each time a new message arrives on the topic. - Quaternion to yaw conversion: The
Odometrymessage stores orientation as a quaternion (). For a ground robot that only rotates about the vertical axis, the yaw angle can be extracted using the simplified formulayaw = 2 * atan2(qz, qw). This avoids importing a full quaternion library for the common case. - Message field access: The
Odometrymessage contains nested structures. Position is accessed throughmsg.pose.pose.position, orientation throughmsg.pose.pose.orientation, and velocities throughmsg.twist.twist. The double nesting (pose.pose) exists because the outer layer includes a covariance matrix alongside the pose.
1.6.5 Using Launch Files
Launch files start multiple nodes simultaneously with configured parameters, topic remappings, and conditional logic. ROS 2 uses Python-based launch files for maximum flexibility.
# robot_launch.py -- launches publisher and subscriber with parameters
        from launch import LaunchDescription
        from launch.actions import DeclareLaunchArgument
        from launch.substitutions import LaunchConfiguration
        from launch_ros.actions import Node

        def generate_launch_description():

        # Declare launch arguments (can be overridden from command line)
        speed_arg = DeclareLaunchArgument(
        'linear_speed',
        default_value='0.3',
        description='Forward speed in m/s'
        )

        # Define the publisher node
        publisher_node = Node(
        package='my_robot_pkg',
        executable='cmd_vel_publisher',
        name='cmd_vel_publisher',
        parameters=[{
            'linear_speed': LaunchConfiguration('linear_speed'),
            'angular_speed': 0.0,
            'publish_rate':  10.0,
        }],
        output='screen'
        )

        # Define the subscriber node
        subscriber_node = Node(
        package='my_robot_pkg',
        executable='odom_subscriber',
        name='odom_subscriber',
        output='screen'
        )

        return LaunchDescription([
        speed_arg,
        publisher_node,
        subscriber_node,
        ])
Running the Launch File:
# Launch with default parameters
        ros2 launch my_robot_pkg robot_launch.py

        # Launch with overridden parameter
        ros2 launch my_robot_pkg robot_launch.py linear_speed:=0.8
Parameter Files
For complex systems with many parameters, YAML files provide a cleaner configuration approach:
# params.yaml -- parameter configuration file
        cmd_vel_publisher:
        ros__parameters:
        linear_speed: 0.5
        angular_speed: 0.1
        publish_rate:  20.0

        odom_subscriber:
        ros__parameters:
        log_frequency: 5.0
The YAML file is referenced in the launch file by passing it to the parameters
argument of the Node action. This separates configuration from code, allowing the same
nodes to be reused across different robots by swapping parameter files.
1.6.6 Visualizing with RViz2
RViz2 is the primary visualization tool for ROS 2. It renders 3D representations of robot models, sensor data, maps, planned paths, and coordinate frames by subscribing to standard ROS 2 topics.
Launching RViz2
# Start RViz2
        rviz2

        # Start RViz2 with a saved configuration
        rviz2 -d path/to/config.rviz
Key Display Types:
- RobotModel: Renders the robot’s URDF (Unified Robot Description Format)
model in 3D, showing links, joints, and their current configuration. Requires the
robot_state_publishernode to broadcast joint transforms on tf2. - LaserScan: Visualizes LiDAR data from
/scanas a point cloud or line display. Each range measurement is rendered as a point at the corresponding distance and angle, providing a visual representation of the robot’s surroundings. - TF: Displays coordinate frame axes and their parent-child relationships.
Essential for verifying that sensor frames are correctly positioned relative to the
robot base and that the
odom-to-base_linktransform is updating correctly. - Map: Renders occupancy grid maps from
/map, showing free space (white), occupied cells (black), and unknown regions (gray). - Path: Displays planned paths from Nav2 as lines overlaid on the map.
- Odometry: Renders the robot’s pose history as a trail of arrows, showing the trajectory the robot has followed.
Debugging with RViz2: When the robot behaves unexpectedly, RViz2 is the first diagnostic tool. If the robot model appears at the wrong location, the tf2 tree has an error. If LiDAR points do not align with walls in the map, the sensor transform is misconfigured. If the planned path passes through obstacles, the costmap is not receiving sensor data. Visual debugging through RViz2 is far more efficient than inspecting raw numeric data in terminal output.
1.6.7 Connecting to Gazebo Simulation
Gazebo provides a physics-based simulation environment where the complete robot software stack can be tested without hardware. The simulation publishes sensor data and subscribes to commands using the same topics and message types as the real robot, making the transition from simulation to hardware seamless.
The ros_gz_bridge
Gazebo and ROS 2 use different internal communication systems. The ros_gz_bridge
package translates messages between them, mapping Gazebo topics to ROS 2 topics and vice versa.
Each bridge is configured with the Gazebo topic name, ROS 2 topic name, and message type
mapping.
# Launch a bridge for velocity commands and odometry
        ros2 run ros_gz_bridge parameter_bridge \
        /cmd_vel@geometry_msgs/msg/Twist@gz.msgs.Twist \
        /odom@nav_msgs/msg/Odometry@gz.msgs.Odometry
The @ symbols separate the topic name, ROS 2 message type, and Gazebo message type.
The bridge direction is inferred from the message type pairing.
Spawning a Robot in Gazebo
A robot is defined by a URDF or SDF (Simulation Description Format) model that describes its geometry, mass properties, joints, sensors, and plugins. The model is spawned into a running Gazebo simulation:
# Launch Gazebo with an empty world
        ros2 launch ros_gz_sim gz_sim.launch.py

        # Spawn a robot model from a URDF file
        ros2 run ros_gz_sim create -file path/to/robot.urdf -name my_robot -z 0.1
Sending Commands to the Simulated Robot
Once the bridge is running, the simulated robot responds to the same /cmd_vel
commands as a real robot:
# Drive the simulated robot forward
        ros2 topic pub /cmd_vel geometry_msgs/msg/Twist "{linear: {x: 0.5}, angular: {z: 0.0}}"

        # Verify odometry is being published
        ros2 topic echo /odom
The simulation loop operates as follows: the controller node publishes a Twist message
on /cmd_vel; the bridge forwards it to Gazebo; Gazebo applies the velocity to the
simulated robot model and computes the resulting physics; sensor plugins generate simulated
LiDAR scans, camera images, and IMU data; the bridge forwards these sensor messages back to
ROS 2; perception and planning nodes process the simulated sensor data exactly as they would
process real sensor data.
1.6.8 Web-Based Control via rosbridge
The rosbridge suite provides a WebSocket interface to ROS 2, enabling web browsers and non-ROS applications to interact with the robot system. This is particularly useful for building monitoring dashboards, remote teleoperation interfaces, and cross-platform control applications.
Architecture
The rosbridge_server node opens a WebSocket server (default port 9090) that accepts
JSON-formatted messages. Web clients connect to this server and can publish messages, subscribe
to topics, call services, and interact with actions. The roslibjs JavaScript library
provides a convenient API for web applications to communicate through rosbridge.
Starting the rosbridge Server
# Install rosbridge suite
        sudo apt install ros-humble-rosbridge-suite

        # Launch the WebSocket server
        ros2 launch rosbridge_server rosbridge_websocket_launch.xml
Web Client Example
A minimal web page that connects to rosbridge and sends velocity commands:
<!-- Include roslibjs library -->
        <script src="https://cdn.jsdelivr.net/npm/roslib/build/roslib.min.js"></script>

        <script>
        // Connect to rosbridge WebSocket server
        var ros = new ROSLIB.Ros({ url: 'ws://localhost:9090' });

        // Create a topic publisher for /cmd_vel
        var cmdVel = new ROSLIB.Topic({
            ros: ros,
            name: '/cmd_vel',
            messageType: 'geometry_msgs/msg/Twist'
        });

        // Publish a velocity command
        var twist = new ROSLIB.Message({
            linear:  { x: 0.5, y: 0.0, z: 0.0 },
            angular: { x: 0.0, y: 0.0, z: 0.3 }
        });
        cmdVel.publish(twist);

        // Subscribe to odometry
        var odomListener = new ROSLIB.Topic({
            ros: ros,
            name: '/odom',
            messageType: 'nav_msgs/msg/Odometry'
        });
        odomListener.subscribe(function(message) {
            console.log('Position: ' + message.pose.pose.position.x);
        });
        </script>
Key Consideration: rosbridge adds latency (typically 10–50 ms over WebSocket) and is not suitable for safety-critical real-time control. It is appropriate for supervisory control, monitoring, and teleoperation where moderate latency is acceptable. High-frequency control loops (motor PID, sensor fusion) should always run as native ROS 2 nodes.
Key ROS 2 Commands Reference
The following commands are used daily when developing and debugging ROS 2 applications:
# Build all packages in the workspace
        colcon build

        # Build a specific package
        colcon build --packages-select my_robot_pkg

        # Source the workspace after building
        source install/setup.bash

        # List all active topics
        ros2 topic list

        # Show message type and publisher/subscriber counts for a topic
        ros2 topic info /cmd_vel

        # Display messages on a topic in real time
        ros2 topic echo /odom

        # Publish a single message to a topic
        ros2 topic pub /cmd_vel geometry_msgs/msg/Twist "{linear: {x: 0.5}, angular: {z: 0.0}}"

        # Publish at a specific rate (10 Hz)
        ros2 topic pub --rate 10 /cmd_vel geometry_msgs/msg/Twist "{linear: {x: 0.5}, angular: {z: 0.0}}"

        # List all active nodes
        ros2 node list

        # Show information about a specific node
        ros2 node info /cmd_vel_publisher

        # List all available services
        ros2 service list

        # Call a service
        ros2 service call /reset_odom std_srvs/srv/Empty

        # List parameters of a node
        ros2 param list /cmd_vel_publisher

        # Get a parameter value
        ros2 param get /cmd_vel_publisher linear_speed

        # Set a parameter value at runtime
        ros2 param set /cmd_vel_publisher linear_speed 0.8

        # Record topic data to a bag file
        ros2 bag record -o my_bag /cmd_vel /odom /scan

        # Play back a recorded bag file
        ros2 bag play my_bag

        # View the tf2 frame tree
        ros2 run tf2_tools view_frames
Integration: Theory to Practice
The practical workflow presented in this module forms the development cycle used throughout the
course. Every lab session follows the same pattern: write or modify nodes in the workspace,
build with colcon, source the overlay, launch nodes, and verify behavior through
RViz2 and command-line introspection. The publisher-subscriber pattern demonstrated here scales
directly to full robotic systems: the cmd_vel publisher becomes a navigation
controller, the odom subscriber becomes a state estimator, and launch files grow to
orchestrate dozens of nodes with complex parameter configurations. Gazebo simulation allows
testing before deploying to hardware, catching software errors in a safe environment where
crashes cost nothing. The rosbridge interface extends the ROS 2 system to web technologies,
enabling monitoring dashboards and teleoperation interfaces that run in any browser without
installing ROS 2 on the client machine. Understanding these practical foundations is essential
because every theoretical concept in subsequent modules (SLAM, path planning, control) is
implemented and tested using exactly these tools and workflows.
Theoretical Design Choices
Why Python for prototyping and C++ for production: Python’s interpreted nature and dynamic typing enable rapid development — a new node can be written and tested in minutes without a compile step. However, Python’s Global Interpreter Lock and interpreted execution make it 10–100 slower than C++ for computationally intensive tasks. The standard practice is to prototype in Python, validate the algorithm, and then rewrite performance-critical nodes in C++. ROS 2’s build system supports mixed-language workspaces, and the topic-based communication means Python and C++ nodes interoperate transparently.
Why colcon over catkin: ROS 1 used catkin, which was tightly coupled to CMake and supported only C++ and Python through custom macros. Colcon is a meta-build tool that delegates to the appropriate build system (CMake, setuptools, or others) for each package. This clean separation allows ROS 2 packages to use standard build tools without ROS-specific modifications, making it easier to integrate non-ROS libraries and to build packages outside of a ROS 2 workspace.
Why simulation-first development: Building and testing directly on hardware is slow (deploy, observe, debug, repeat) and risky (software bugs can cause physical damage). Gazebo simulation provides deterministic, repeatable testing at speeds up to real time. Sensor noise models and physics simulation produce realistic behavior that transfers to hardware. The same code runs in simulation and on the real robot because both use identical ROS 2 topics and message types. The simulation-to-reality gap is managed by validating critical behaviors on hardware after simulation testing passes, not by skipping simulation entirely.
Why rosbridge uses JSON over WebSocket rather than native DDS: Web browsers cannot run DDS natively. WebSocket is the standard protocol for bidirectional communication between browsers and servers, and JSON is the universal data interchange format for web applications. The rosbridge design sacrifices the performance and QoS guarantees of DDS in exchange for universal accessibility from any platform that supports a web browser. For supervisory and monitoring applications, this trade-off is appropriate because the data rates are low and moderate latency is acceptable.